


A hose is a wise investment, but high-quality ones do not come cheap. We highly recommend purchasing a hose reel to lengthen your hose’s lifespan and maximize its benefits. The hose reel will keep your hose secured while in use and safely stored once finished.
Below, we take you on a quick guide on installing garden hose reels in your yard and other frequently asked questions for first-time hose reel users or those who simply want a refresher.
How do you set up a garden hose reel? - Step by Step
Maneuvering a hose reel isn’t difficult. It has a rolling feature to coil up the garden hose around a spindle. This helps hold the hose in place, away from harsh environments, and keeps the surrounding areas safe and clean.
There are different styles of hose reels, with the most common designs featuring a hand crank. This is also one of the most reliable types and what we will focus on today in our guide. Below are quick steps to assemble a hand-crank garden hose reel properly.
Step 1: Preparing The Body Of The Reel

The first thing to take care of is the main body of the reel. Assembling this can vary per model, as even hand crank reels come in different designs. However, most variants share similar kinds of parts (listed below) and should be easy to put together with the help of the instruction manual.
- Hose adaptor
- Handle
- Reel supports
- Drum Plates
- Metal frames
- Side plates
- Wheels or wall mount
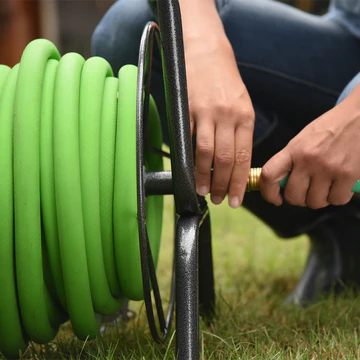
Step 2: Prepare The Hose

In the instance that you already have an old hose attached to your current reel, simply uncoil the entire garden hose until it is fully extended. This will then show the hose adaptor connecting to the fitting inside the drum's center of the reel body.
Twist the hose adaptor by hand or pliers until they are fully disconnected.
Next, take the new garden hose and attach the female end connector to the hose, coupling it into your new reel’s drum. Tighten the fitting using pliers to ensure that it does not leak out while in use. However, it is important to not over-tighten, as this can cause damage.
Note: We recommend utilizing a rubber washer at the bottom of the hose before connecting it to the drum. This way, you can further prevent leaks without the risk of over-tightening or damaging the coupling.
Step 3: Wind It Up

Once the connection is intact, slowly start winding the hose into the reel drum by rotating the hand crank. With each turn, ensure that you are flattening out the level to avoid gaps in between or taking up unnecessary space.
Step 4: Connect The Feeder Hose
Once the hose connection is in place, find the short feeder hose located outside the body of the reel. Connect this to your outdoor faucet, and there you have it! Your hose reel is now successfully installed.
Where should hose reels be placed?
Determining where you should place your hose reel depends on the kind of model you have. Standing hose reels should be placed closest to the spigot on the side of your house. This gives you easy access to water and makes the process more convenient. The same goes for wall-mounted hose reels.
However, for portable hose reels or those with wheels, you may either store them by the spigot or keep them in the shed while not in use.
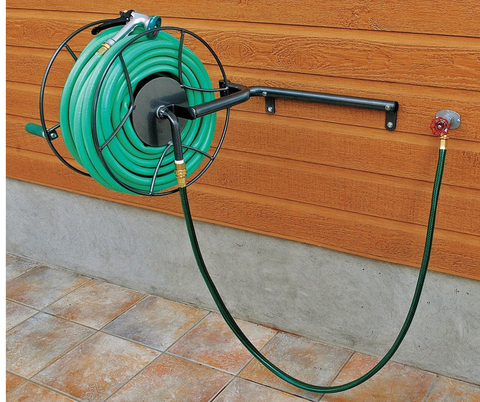
How do you attach a hose reel to the wall?
Wall-mounted hose reels have all the necessary parts to attach them to the wall. Once you have purchased your hose reel, follow these simple steps:
Step 1: Place the bracket on the wall and mark the area you intend to drill holes. Measure twice and always double-check.
Step 2: Once the holes have been drilled through, install the screws.
Step 3: Push in the fittings provided in the package and make sure they are tightly secured.
Step 4: Screw the bracket into the wall while following the product’s instruction manual. Take your time with this to keep the installation even.
Step 5: Tightly secure the screws or brackets and install the hose reel.
How high should a hose reel be off the ground?
The height of the hose reel matters because you want it to be easily reachable while still keeping it close to the spigot. At the same time, you don’t want it low enough to damage any surrounding plants.
The ideal height for the reel would be about 4 feet (120cm) between the bottom of the reel’s body and the ground's surface. You may want to adjust this to your preference if you are exceptionally tall.
Can you leave a hose reel out for the winter?
You may choose to store your hose reel or leave it out in the cold – either is fine. Our hose reel variants are all constructed with robust material that is designed to withstand harsh and extreme weather. On the other hand, if you can keep it securely stored, this would still be our first choice.
Looking for a quality garden hose reel?
Check our selection below!


